Search This Blog

Showing posts with label bread. Show all posts

Thursday, June 11, 2020

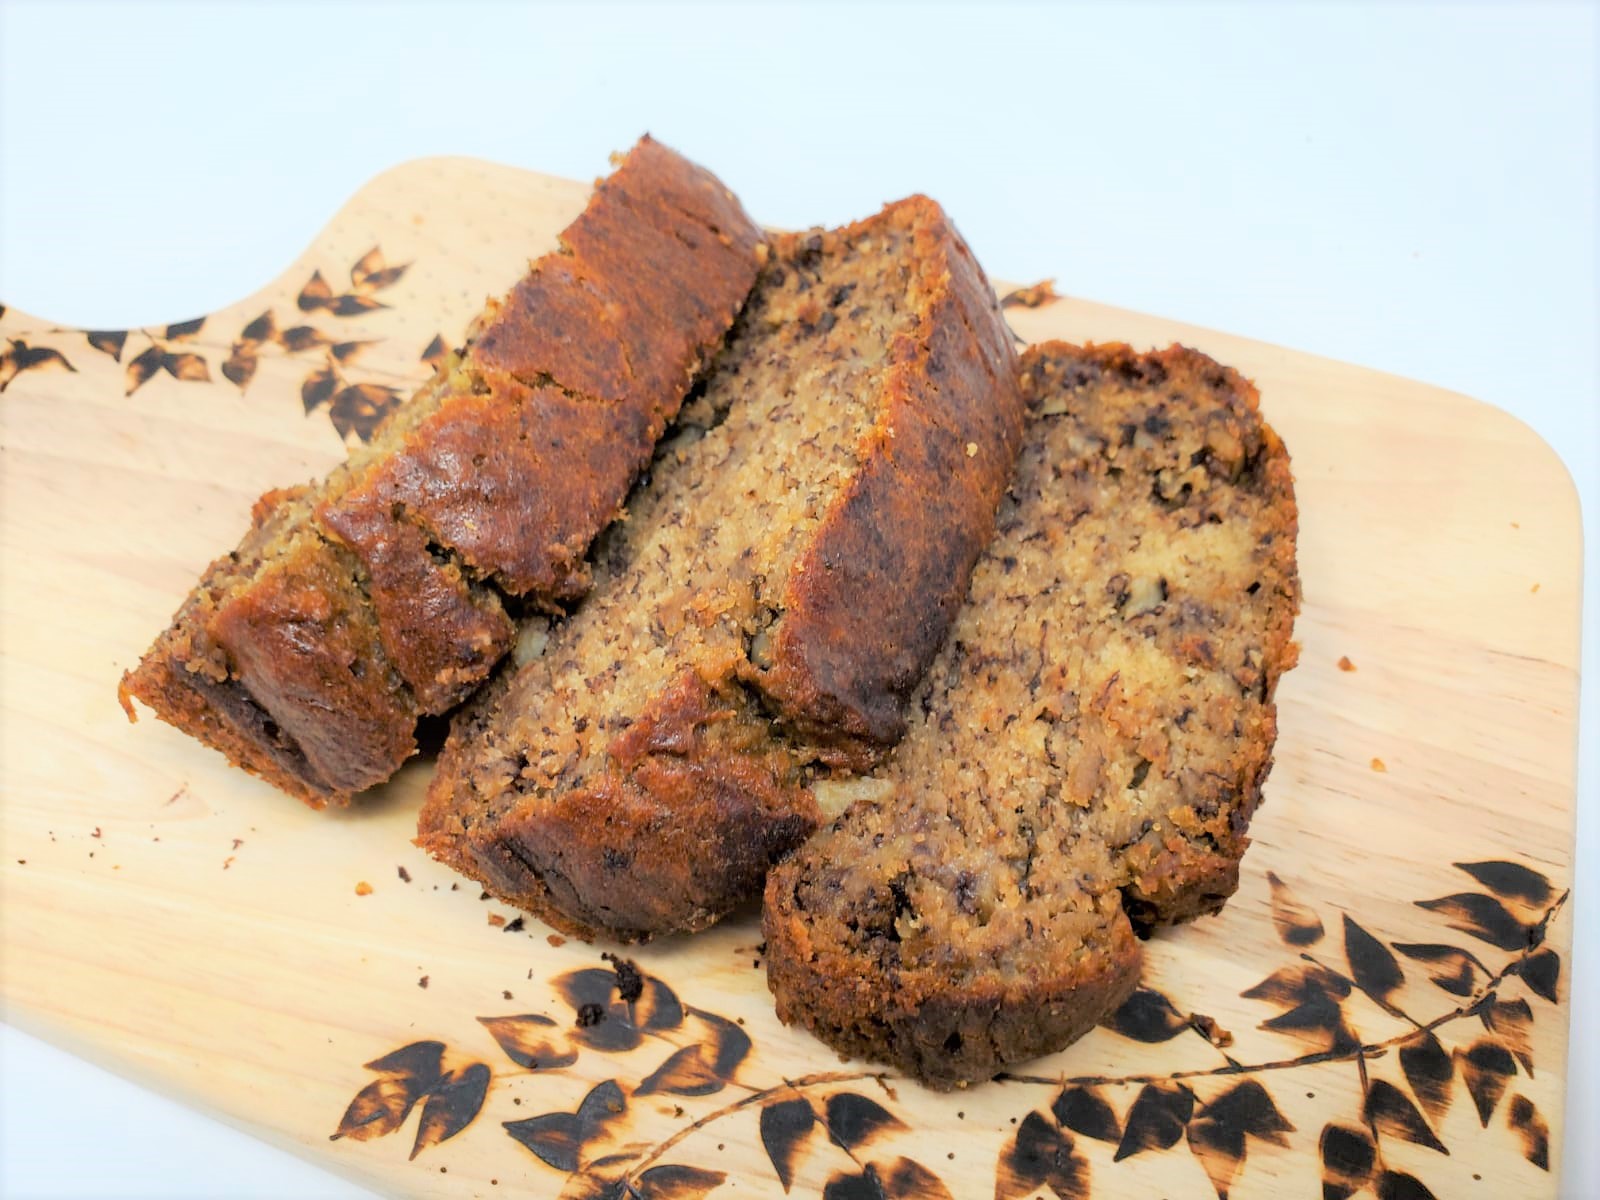
One-Bowl Banana Bread with Walnuts (Vegan)

Too many ripe bananas is always a good thing in my opinion.  I either chop them up and freeze them for smoothies/ "nice cream" or make. . . banana bread!  This recipe is easy, nutty, and perfectly moist with an occasional walnut crunch.  You can't really go wrong with this recipe as you are 1. getting rid of those too ripe bananas; 2. making only one bowl dirty (less dishes, hooray!); and, 3. ending up with a delicious loaf to enjoy alone or with your favorite plant butter.  

Hate walnuts? Omit them or substitute a different nut.  Don't be afraid to experiment - sub coconut, raisins, or chocolate chips!

Want a healthier version?  Check out my No Sugar No Oil Banana Bread with Chopped Apricots.  Super delicious, without the guilt!


Ingredients:

1 tablespoon flax seed meal
3 tablespoons water
1/3 cup coconut oil, melted
3 overripe bananas, mashed (spottier and riper = better)
1/3 cup brown sugar
1/3 cup granulated sugar
1 teaspoon vanilla extract
1 teaspoon baking soda
1/4 teaspoon salt
1 and 1/2 cups all purpose flour
1/2 cup walnuts, chopped (sub another nut or omit)


Instructions:

Following these instructions exactly will provide the best results.

1. In a bowl, prepare your flax egg by combining the flax seed meal with water.  Let sit for five minutes.
2. Add the melted coconut oil, mashed bananas, brown sugar, granulated sugar, vanilla, baking soda, and salt.   Mix well.
3. Add the flour in 1/2 cup increments, mixing just enough to blend the ingredients.  There is no need to over-mix.
4. Add the chopped walnuts and mix.
5. Pour the batter in a 9x5 greased loaf pan (you can also use parchment paper).  
6. Bake at 350 degrees for 60-65 minutes or until a toothpick inserted into the loaf comes out clean.
7. Remove from the oven and allow the loaf to cool for at least 30 minutes, prior to removing from the pan.
8. Remove from the pan and slice with a bread knife.
9.  Enjoy alone or with your favorite plant butter!  If you have any leftovers, store in an airtight container in the fridge for up to a week.


#halahbakes

Monday, November 12, 2018

Persimmon Bread (Vegan, No Oil, Sweetened with Fruit)

Have you ever tried a fuyu persimmon? They are sweet and crunchy when they are hard, or pudding like when they are soft.  But, my favorite thing to do with persimmons is to bake with them!

Why create this recipe? Because my dad has persimmon trees in his yard and we had over 300 persimmons to consume! Hopefully, this recipe will come to the aid of persimmon tree owners and persimmon lovers! Your family and friends will gobble this deliciousness right before your eyes!

PS This recipe is for TWO loaves of bread, but can easily be halved.


Ingredients:

2 flax eggs (2 tablespoons ground flaxseed mixed with 6 tablespoons water)
1 tablespoon vanilla
3 cups ripe fuyu persimmon pureed without peels (around 6 to 8 persimmons)
3 to 6 medjool dates *for your preference of additional sweetness*
3/4 cups almond milk
2 teaspoons baking soda
1/4 teaspoon salt
1/4 cup cinnamon
3 cups all purpose flour
1 cup chopped walnuts
1 cup raisins
1/4 cup oil *optional*


Instructions:

Following these instructions exactly will provide the best results.

1. Prepare your flax eggs in a small bowl by combining 2 tablespoons of ground flaxseed with 6 tablespoons of water. Let the mixture sit for about 5 minutes.

2. In a blender or food processor, blend the vanilla, pureed persimmons, and medjool dates until you get a fairly smooth consistency. Set aside.
3. In a large bowl, combine the baking soda, salt, cinnamon, and all purpose flour together.
4. Add the pureed persimmon mixture, the almond milk, flax eggs, and the optional oil into the flour mixture and mix well so that there are no flour clumps.
5. Fold in the raisins and chopped walnuts.
6. Divide the batter evenly between two oiled bread loaf pans.
7. Bake for 60 minutes at 350 degrees or until a wooden toothpick inserted into the center of the loaves comes out clean. Cool in the pans for 10 minutes and then turn out to cool further.
8. Slice with a bread knife, and enjoy! Store any leftovers in an airtight container in the fridge.


#halahbakes

Saturday, April 14, 2018

Onion Thyme Quinoa Bread (Vegan, No Oil)

Oh, for the love of quinoa! If you aren't aware, quinoa is a popular super food and incredibly versatile!

The end result of this recipe is pretty darn tasty. Dip a slice of this bread in spaghetti sauce . . . and my, oh, my! 

Truth be told, I only began experimenting with quinoa flour because my mom bought some months ago and didn't know what to do with it. . .it turns out, you can do a lot. Moreover, you can cheaply make your own quinoa flour (with a spice grinder) - and, hey, why not save some bucks?

Ingredients:

2 cups quinoa flour
1 cup all purpose flour
1 teaspoon baking soda
1 teaspoon baking powder
3/4 teaspoon salt
1 tablespoon thyme
1 tablespoon onion powder
2 cups almond milk
1 tablespoon vinegar (any type)

Optional Ingredients:
3/4 teaspoon cayenne pepper (for a spicy bread)
3 tablespoons olive oil (for enhanced texture)


Instructions:

Following these instructions exactly will provide the best results.

1. In a large bowl, combine the quinoa flour, all purpose flour, baking soda, baking powder, salt, thyme, onion, powder, and cayenne pepper (optional).

2. In a small to medium bowl, combine the almond milk, vinegar, and oil (optional).
3. Pour the almond milk and vinegar mixture into the dry ingredients and mix well (there should be no clumps of flour).
4. Transfer the dough into a greased 8x5" loaf pan. You can also consider using parchment paper in the pan if you prefer to use no oil.
5. Lightly cover the pan with aluminum foil.
6. Bake for 30 minutes at 400 degrees with the aluminum foil covering the pan.
7. Remove the aluminum foil and bake the bread for an additional 30 minutes (totaling 60 minutes of bake time).
8. Remove the bread from the oven, let cool, remove from the pan, and slice.
9. Enjoy and refrigerate any leftover slices in a plastic container in the fridge.


#halahbakes

Friday, February 9, 2018

Turmeric, Sesame, and Nigella Bread

Ah, how I love Indian (desi) flavors and spices. I created this bread to spice up my sandwich world. I also wanted to see how much turmeric I needed to make a beautiful (yet, still tasty) loaf! The answer: not much! Baker be warned: too much turmeric alters the flavor, so it is better to stick with less!

This recipe like many of my other bread recipes requires a cast iron pan (containing boiling water) to be used under the tray used for baking the bread. Following this technique is a good idea as you will get a soft and moist bread with a crunchy crust!


Ingredients:

2 tablespoons yeast
1 and 1/2 cups water
3 cups all purpose flour
2 tablespoons salt
1 to 2 tablespoons turmeric (depending on your desired color -any more will likely start to alter flavor)
1/4 cup sesame seeds
1/4 cup nigella seeds (these are also called kalonji)
Additional flour for dusting
4 cups of water for boiling (not to be used in bread)


Instructions:

Following these instructions exactly will provide the best results.

1. 
Combine water (about 110 degrees - the temperature of bath water) with yeast and let set for 5 minutes to get foamy. If your yeast does not get foamy, this means your water was too hot and/or that your yeast is no longer active.
2. In a large bowl, combine the all purpose flour, salt, turmeric, sesame seeds, and nigella seeds. Mix the dry ingredients well.
3. Add in the foamy yeast water and knead the dough until thoroughly mixed. Knead for about five minutes.
4. Cover the bowl with plastic wrap and let the dough rise in a warm place for 1 hour.
5. Once the dough has doubled in size, lightly sprinkle the dough with additional flour and transfer to a generously floured work surface. Knead the dough a few times and add flour or water as needed (such that the dough is slightly tacky, but I would not mess around with the proportions of the current recipe too much).
6. Roll your dough into a ball and place on a baking sheet. Sift a light coating of flour over the top to help keep the dough moist. Let the dough sit for 5 to 10 minutes.
7. Preheat your oven to 450°F, fill a metal or cast iron pan (not glass, Pyrex, or ceramic) with the 4 cups of water, and place on the lowest oven rack.
8. When the oven is ready, slash the bread 2 or 3 times with a knife or blade, making a cut about 1/2 inch deep. *If desired, sprinkle sesame / nigella seeds in the slashes for the "look" seen in the pictures.
9. Place the bread tray on the middle rack, above the rack with the pan now containing boiling water. Close the oven door quickly.
10. Bake the bread for 35-45 minutes or until golden brown and crusty.
11. Remove the bread from the oven and cool. Enjoy! Once fully cooled, store leftovers in a plastic bag at room temperature.


#halahbakes

Wednesday, January 24, 2018

Savory Pear and Walnut Bread

I am in love! In love with what? The slightly sweet tang of pear and crunchiness of walnut that you taste when you take a bite out of this bread. Love. Love. Love. Try it out my friends. You won't regret it.

This recipe like many of my other bread recipes requires a cast iron pan (containing boiling water) to be used under the tray used for baking the bread. Following this technique is a good idea as you will get a soft and moist bread with a crunchy crust!


Ingredients:

2 tablespoons yeast
1 and 1/2 cups water
3 and 1/4 cups all purpose flour
2 tablespoons salt
2 tablespoons cinnamon
1 peeled and diced pear
1/2 cup chopped walnuts
Cinnamon for topping
Additional flour for dusting
4 cups of water for boiling (not to be used in bread)


Instructions:

Following these instructions exactly will provide the best results.

1. 
Combine water (about 110 degrees - the temperature of bath water) with yeast and let set for 5 minutes to get foamy. If your yeast does not get foamy, this means your water was too hot and/or that your yeast is no longer active.
2. In a large bowl, combine the all purpose flour, salt, and cinnamon. Mix the dry ingredients well.
3. Add in the foamy yeast water and knead the dough until thoroughly mixed.
4. Add in the diced pear and walnuts. Knead for another five minutes until thoroughly mixed. 
5. Cover the bowl with plastic wrap and let the dough rise in a warm place for 1 hour.
6. Once the dough has doubled in size, lightly sprinkle the dough with additional flour and transfer to a generously floured work surface. Knead the dough a few times and add flour or water as needed (such that the dough is slightly tacky, but I would not mess around with the proportions of the current recipe too much).
7. Roll your dough into a ball and place on a baking sheet. Sift a light coating of flour over the top to help keep the dough moist. Let the dough sit for 5 to 10 minutes.
8. Preheat your oven to 450°F, fill a metal or cast iron pan (not glass, Pyrex, or ceramic) with the 4 cups of water, and place on the lowest oven rack.
9. When the oven is ready, slash the bread 2 or 3 times with a knife or blade, making a cut about 1/2 inch deep. *If desired, sprinkle cinnamon in the slashes for the "look" seen in the pictures.
10. Place the bread tray on the middle rack, above the rack with the pan now containing boiling water. Close the oven door quickly.
11. Bake the bread for 35-45 minutes or until golden brown and crusty.
12. Remove the bread from the oven and cool. Enjoy! Once fully cooled, store leftovers in a plastic bag at room temperature.


#halahbakes

Friday, January 19, 2018

Purple Sweet Potato Bread (Vegan)

I always have admired breads gushing with natural color. So I tried it out and hooray! This is it! I purchased purple sweet potatoes from my local Asian market, boiled them, mushed them, and added them into my go-to bread recipe. And, bam! Purple, moist, crunchy-crusted, soft, and delicious bread! Note: the sweet potato flavor is very light in this recipe. If you are looking for more of a sweet potato flavor or for a darker purple color, you may want to experiment with this recipe by altering the almond milk to sweet potato ratio.

As with my last recipe post for Onion and Pepper Bread, this recipe does require an extra deep dish pan to boil water. This  pan will go below the baking tray to create steam. Thus, you get the amazing crispy crust on your bread, but a totally soft inside! 


Ingredients:

2 tablespoons yeast
1 and 1/2 cups almond milk (or any other milk)
2 cups whole wheat flour
1 and 1/4 cups unbleached all purpose flour
2 tablespoons salt
2 cups boiled, peeled, and mushed purple sweet potato
Additional flour for dusting
4 cups of water for boiling (not to be used in bread)


Instructions:

Following these instructions exactly will provide the best results.

1. 
Combine almond milk (about 110 degrees - the temperature of bath water) with yeast in a large mixing bowl and let set for 5 minutes to get foamy. If your yeast does not get foamy, this means your almond milk was too hot and/or that your yeast is no longer active.
2. In a large bowl, combine the whole wheat flour, all purpose flour,  and salt. Mix the dry ingredients well.
3. Add in the foamy yeast milk and knead the dough until thoroughly mixed.
4. Add in the mushed sweet potato. I recommend mushing the sweet potato in a food processor so that you don't have large chunks of potato in your bread. Knead for another five minutes until the sweet potato is thoroughly mixed in with the dough. 
5. Cover the bowl with plastic wrap and let the dough rise in a warm place for 1 hour.
6. Once the dough has doubled in size, lightly sprinkle the dough with additional flour and transfer to a generously floured work surface. Knead the dough a few times and add flour or water as needed (such that the dough is slightly tacky, but I would not mess around with the proportions of the current recipe too much).
7. Roll your dough into a ball and place on a baking sheet. Sift a light coating of flour over the top to help keep the dough moist. Let the dough sit for 5 to 10 minutes.
8. Preheat your oven to 450°F, fill a metal or cast iron pan (not glass, Pyrex, or ceramic) with the 4 cups of water, and place on the lowest oven rack.
9. When the oven is ready, slash the bread 2 or 3 times with a knife or blade, making a cut about 1/2 inch deep.
10. Place the bread tray on the middle rack, above the rack with the pan now containing boiling water. Close the oven door quickly.
11. Bake the bread for 35 to 45 minutes or until golden brown and crusty.
12. Remove the bread from the oven and cool. Enjoy! Once fully cooled, store leftovers in a plastic bag at room temperature.


#halahbakes

Friday, January 12, 2018

Onion and Pepper Bread (Vegan)

Of all the breads to bake, this is the one! This savory and crunchy crusted bread has the perfect texture and levels of moisture. It is hard to go wrong (in fact, I have successfully pulled off the same great taste when I accidentally baked the bread 1o minutes longer than I had planned!).

This recipe does require an extra deep dish pan to boil water. This  pan will go below the baking tray to create steam. Thus, you get the amazing crispy crust on your bread, but a totally soft inside! After this, you can call yourself an artisan bread baker! ;)


Ingredients:

2 tablespoons yeast
1 and 1/2 cups warm water
2 cups whole wheat flour
1 and 1/4 cups unbleached all purpose flour
2 tablespoons salt
1/2 cup old fashioned oats
1 bell pepper diced into small pieces (any color)
1/2 onion diced into small pieces
1 teaspoon black pepper
1 teaspoon cayenne pepper (if desired)
1 chopped chili pepper or ghost pepper (if desired)
1 tablespoon flax seed powder (if desired)
Additional flour for dusting
4 cups of water for boiling (not to be used in bread)


Instructions:

Following these instructions exactly will provide the best results.

1. 
Combine warm water (about 110 degrees) with yeast in a large mixing bowl and let set for 5 minutes to get foamy. If your yeast does not get foamy, this means your water was too hot and/or that your yeast is no longer active.
2. In a large bowl, combine the whole wheat flour, all purpose flour, salt, old fashioned oats,  black pepper, cayenne pepper (if desired), and flax seed powder (if desired). Mix the dry ingredients well.
3. Add in the foamy yeast water and knead the dough until thoroughly mixed.
4. Add in the diced bell pepper, onions, and chili peppers (if desired). Knead the dough for another five minutes.
5. Cover the bowl with plastic wrap and let the dough rise in a warm place for 1 hour.
6. Once the dough has doubled in size, lightly sprinkle the dough with additional flour and transfer to a generously floured work surface. Knead the dough a few times and add flour as needed (such that the dough no longer sticks to your fingers, but not too much as this can dry out your bread).
7. Roll your dough into a ball and place on a baking sheet. Sift a light coating of flour over the top to help keep the dough moist. Let the dough sit for 5 to 10 minutes.
8. Preheat your oven to 450°F, fill a metal or cast iron pan (not glass, Pyrex, or ceramic) with the 4 cups of water, and place on the lowest oven rack.
9. When the oven is ready, slash the bread 2 or 3 times with a knife or blade, making a cut about 1/2 inch deep.
10. Place the bread tray on the middle rack, above the rack with the pan now containing boiling water. Close the oven door quickly.
11. Bake the bread for 35 minutes or until golden brown and crusty.
12. Remove the bread from the oven and cool. Enjoy! Once fully cooled, store leftovers in a plastic bag at room temperature.


#halahbakes

Wednesday, October 11, 2017

Spicy Cheesy Biscuits (Vegan)

These are the cheesiest tasting vegan biscuits I have ever tasted. The magic ingredient? Nutritional yeast. With some extra spice added (I used ghost pepper, but this recipe uses more mild chili peppers), these biscuits transform into flavor filled gems. Try them out and let me know what you think!

Ingredients:

2 cups all purpose flour
1/4 cup nutritional yeast
1 tablespoon baking powder
1/2 teaspoon baking soda
1 teaspoon salt
3 tablespoons coconut oil (solid)
1-2 chili peppers diced into very small pieces (sub any other type of spicy pepper)
1 cup almond milk
1 tablespoon lemon juice


Instructions:

Following these instructions exactly will provide the best results.

1. Add 1 tablespoon of lemon juice into the almond milk and set aside. This is how we make vegan "buttermilk."
2. Mix the flour, nutritional yeast, baking powder, baking soda, salt and chili peppers together.
3. Add the coconut oil into the flour mixture. The coconut oil should be in solid form (if your coconut oil has melted due to heat, place the oil into the fridge so that it can harden). Once the coconut oil has been mixed into the flour mixture, the flour will have a "crumbled" look.

4. Add in the almond milk/lemon juice mixture into the flour mixture. Stir until combined, but do not overmix. The dough will be very sticky.
5. Cut the dough with a knife or pastry cutter into eight pieces.
6. After flouring your hands, grab each piece and create a flattened disc shape. Place on a foiled baking sheet so that the biscuits touch. See photo:
7. After all biscuits are placed on the foiled baking sheet, use your thumb to create a divot thumbprint in the middle of each biscuit. This prevents the biscuits from becoming dome shaped in the oven. (Technique Credit: Minimalist Baker).
8. Bake for 12 to 15 minutes at 450 degrees. The biscuits will be a golden brown color. 
9. Enjoy!

#halahbakes


Sunday, September 10, 2017

Fluffy Pretzel Buns

My husband introduced me to Costco's Pretzel Slider Buns / Rolls a year ago and I could not have enough! But, why buy from Costco when you can make it yourself?! By taking tips from Sally's Baking Addiction and Like Mother Like Daughter, I can successfully say that I won't be going to Costco for these buns anymore!

These are so fluffy, soft, and easy to make. I highly recommend making these even if you are a first-timer. The steps are not difficult, but they do require a very crucial step of boiling the buns for 20 to 30 seconds in baking soda water prior to baking.

If you end up trying out this recipe, please do let me know how it goes! 


Ingredients:
1 and 1/2 cups warm water (not hot, and about the temperature of warm bath water)
 2 teaspoons yeast
1 teaspoon white table sugar
2 tablespoons melted margarine plus additional for brushing the tops of the buns
1 tablespoon brown sugar
3 and 3/4 cups all purpose flour
Salt for topping
Oil for greasing pan

For boiling bath:
1/2 cup baking soda
9 cups water


Instructions:

Following these instructions exactly will provide the best results.

1. In a bowl, mix warm water, yeast, and white table sugar together. Let the solution stand for about 5 minutes. The solution should become foamy and expand. If this does not happen, your water may have been too hot or your yeast is no longer active. Do not take shortcuts on this step!
2. Mix in the melted margarine (warm, but not hot) and tablespoon of brown sugar.
3. Add in one cup of all purpose flour and mix until dough is the consistency of a pancake batter with no clumps. Then, add in the second cup of all purpose flour. At this point, begin mixing with your hands. Once thoroughly mixed, add in the third cup of all purpose flour. The dough should now be somewhat sticky. Add in the remaining 3/4 cups of flour and knead until all flour is combined. The dough will be somewhat stiff. Continue kneading dough for about 3 to 5 minutes.
4. Shape the dough into a ball and place back into bowl. Cover with plastic wrap and let rise for 45 minutes in a warm place.
5. The dough will be double its size. Take off the plastic wrap and punch down the dough. Knead dough a few times in the bowl and break the dough into 12 equal parts. Roll each part into a ball.
6. Preheat your oven to 400 degrees. Foil and grease a 9x11 pan. Set aside.
7. In a large saucepan, combine the baking soda with 9 cups of water. Bring to a boil.
8. Once ready, drop one to two dough balls into the boiling baking soda bath. Boil for 20 to 30 seconds (but, not longer as flavor could be compromised). Remove bun(s) with a slotted spatula or spoon. Allow any excess liquid to drain. Place bun(s) on the foiled and greased pan. Repeat until all 12 buns have been dropped into the baking soda bath and placed on pan (it is okay if the buns touch). Sorry, no shortcuts on this step!!!
9. With a knife, make a few slashes in each bun. Do not worry if your buns look ugly, they will look great after baking!
10. Melt 1 to 2 tablespoons of margarine and brush on top of each bun. Sprinkle salt (any type --- I used plain table salt, but other recipes have used course salt).
11. Bake buns at 400 degrees for 25 minutes. The buns should be a darker golden brown.
12. Remove from oven and enjoy!


#halahbakes

Friday, September 8, 2017

Vegan Whole Wheat "Buttermilk" Biscuits

This recipe does not taste vegan at all. The biscuits are fluffy and soft. This is because it uses "vegan buttermilk" which is basically a mixture of a non-dairy milk (like almond or soy milk) with an acid (like vinegar or lemon juice). Instead of 1 cup of buttermilk, you just have to mix 1 cup of non-dairy milk combined with 1 tablespoon of vinegar or lemon juice and let both sit for about 5 minutes. In baking, you won't taste a difference!


Ingredients:

Vegan Buttermilk:
3/4 cups to maximum 1 cup almond milk (or another type of non-dairy milk)
1 tablespoon rice vinegar (you can also use lemon juice or another clear vinegar)

Other Ingredients:
1/4 cup oil
2 cups whole wheat flour
2 teaspoons baking powder
1/4 teaspoon baking soda
1 teaspoon salt


Instructions:

Following these instructions exactly will provide the best results.

1. Mix whole wheat flour, baking powder, baking soda, and salt in a medium sized bowl.
2. Pour the oil into the dough and mix until the dough resembles fine crumbs.
3. Make your buttermilk: Combine almond milk with vinegar in a separate cup. Stir. Let sit for 5 minutes.
4. Once buttermilk is prepped, pour the "buttermilk" into the dough. Add just enough so that the dough leaves the side of the bowl when kneading. Usually this means pouring just a bit more than 3/4 cups and less than 1 cup. Too much liquid will make the dough sticky and too little liquid will make the biscuits dry.
5. Knead dough for about a minute by hand. The dough will be slightly sticky, but not so much that it will stick to the bowl or your hands.
6. Pull apart about 2 to 3 tablespoons worth of dough and create a ball. On a foiled baking sheet, place the ball on the baking sheet and press down until you have a flattened disc like shape that is about 3/4 of an inch high. The flattened disc diameter will be about 2 inches. Repeat until all dough is used, making sure that biscuits are placed 1 to 2 inches apart from one another. If desired, check out my Instagram video to see this process - swipe right until you get to the video.
7. Bake at 450 degrees for 8 to 9 minutes and until the biscuits are golden brown. If you made your biscuits bigger than in Step 6, increase baking time to 10 to 12 minutes.


***Note: my process is the "lazy" way. If you want clean, sharp edges on the biscuits, roll out dough so that all the dough is 3/4 of an inch thick. Use a 2 to 3 inch biscuit cutter to shape your biscuits.

#halahbakes

Wednesday, September 6, 2017

Traditional Zucchini Bread with Walnuts, Raisins, and Coconut- 2 Loaves

My sisters and I would make zucchini bread every year growing up using this recipe. We would always vary the flavors by adding or omitting raisins, coconut, and walnuts. It was always a hit!


Ingredients:

3 eggs
1 cup oil
2 cups sugar
2 teaspoons vanilla
2 cups shredded zucchini
3 cups all purpose flour
1 1/2 teaspoons baking soda
1 teaspoon salt
3/4 teaspoon baking powder
2 teaspoon cinnamon
1/2 cup finely chopped walnuts
1/2 cup golden raisins
1/2 cup shredded unsweetened coconut


Instructions:


Following these instructions exactly will provide the best results.


1.    Beat eggs in a large bowl.
2.    Add sugar, oil, and vanilla. Continue stirring with a spoon until the mixture is thick.
3.    Add in the shredded zucchini.
4.    In a separate bowl, combine the flour, baking soda, salt, baking powder, cinnamon, walnuts, raisins and coconut.
5.    Stir the flour mixture gently into the zucchini mixture just until blended.
6.    Bake in greased loaf pans at 350 degrees for 50 to 55 minutes (To check if bread is fully cooked, use a thin skewer to poke the bread in its thickest part. The skewer should come out clean as you remove it from the bread).


#halahbakes


Monday, September 4, 2017

Spicy Zucchini Bread

Ingredients:


2 tablespoons yeast
1 1/2 cups warm water
2 cups whole wheat flour
1 1/4 cups unbleached all purpose flour
1 tablespoon salt
1/2 cup old fashioned oats
3 green chili peppers diced into small pieces
5 jalapeno peppers (pickled or raw) diced
2 cups grated zucchini
1 teaspoon basil spice
1/2 teaspoon black pepper
1 tablespoon flax seed powder
1 tablespoon chia seeds
Gram flour ("besan" flour) for dusting
4 cups of water for boiling (not to be used in bread)


Variation Tips:


*The amount of green chili peppers and jalapeno peppers required is based on your desired amount of kick.
* Pickled jalapenos add a slightly stronger kick to the final product than using raw jalapenos.


Instructions:


Following these instructions exactly will provide the best results.


1.       Combine warm water (like bath water) with yeast in a large mixing bowl and let set for 5 minutes to get foamy. Then, add the whole wheat flour, all purpose flour, salt, old fashioned oats, chili peppers, jalapeno peppers, grated zucchini, basil, black pepper, flax seed powder, and chia seeds. Mix and knead dough until thoroughly mixed.
2.       Cover dough and let it rise in a warm place for 1 hour.
3.       Once doubled in size, lightly sprinkle the dough with gram flour and transfer to a generously floured work surface. Knead a few times adding flour as needed.
4.       Place on a baking sheet (you may choose to lightly grease the pan). Sift a light coating of gram flour over the top to help keep the dough moist. Let dough sit for 5 to 10 minutes.
5.       Preheat oven to 450°F, fill a metal or cast iron pan (not glass, Pyrex, or ceramic) with the 4 cups of water, and place on the lowest oven rack.
6.       When the oven is ready, slash the bread 2 or 3 times with a knife, making a cut about ½-inch deep.
7.       Place bread in oven on the middle rack, above the rack with the pan now containing boiling water. Close oven door quickly.
8.       Bake the bread for 25 to 35 minutes, or until golden brown and crusty.
9.       Remove the bread from the oven and cool on a rack. Once fully cooled, store leftovers in a plastic bag at room temperature.

#halahbakes